

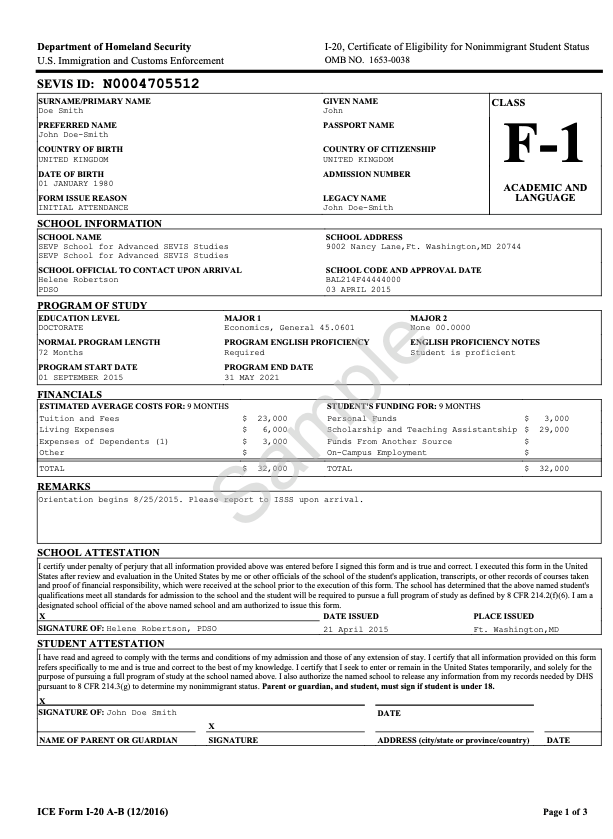
If you want to study English in the United States on an F-1 student visa, there is one document you absolutely cannot skip: the Form I-20. Without it, you can't pay the SEVIS fee, you can't complete your DS-160, and you can't even schedule your consular interview. Everything in the process starts here — which is exactly why it's worth understanding before you begin.
The I-20 — officially the "Certificate of Eligibility for Nonimmigrant Student Status" — is issued by the school that accepts you, through its Designated School Official (DSO). It certifies that the school has admitted you into a full-time program and registered you in SEVIS, the U.S. government's student tracking system.
Your I-20 includes your personal information, the program you were admitted to, your program start and end dates, the estimated cost of attendance, and your SEVIS number — a unique identifier (it starts with the letter "N") that will follow you through every step of the process.
One clarification that saves a lot of confusion: the I-20 is not the visa. It is the prerequisite for requesting one. Think of it as your entry ticket into the visa process itself.
1. Choose an accredited school. Not every language school can issue an I-20 — only SEVP-certified schools can. Confirm this before you apply anywhere.
2. Complete the admission process. Every school has its own requirements, but you'll generally need an application form, a valid passport, and proof of funds showing you can cover tuition and living expenses for your program.
3. Get accepted and wait for your I-20. Once the school admits you, its DSO generates your I-20 and sends it to you — almost always in digital format these days.
4. Review it the moment it arrives. Your name must match your passport letter by letter. A single typo here can delay everything downstream, so don't file it away without checking.
What if something on the I-20 is wrong? Don't try to fix it yourself and don't ignore it. Contact the school's DSO right away — they will correct and reissue the form, usually within a few days. Paying the SEVIS fee or filing the DS-160 against an incorrect I-20 creates mismatches that are far more painful to untangle later.
Don't try to fix it yourself and don't ignore it. Contact the school's DSO right away — they will correct and reissue the form, usually within a few days. Paying the SEVIS fee or filing the DS-160 against an incorrect I-20 creates mismatches that are far more painful to untangle later.
It depends on the school, but the typical range is 1 to 4 weeks after you've completed admission and submitted your financial documents. Larger schools with fully digital processes tend to move faster. If you're working toward an interview date, request your I-20 at least two months in advance — admission backlogs are real, especially before peak semesters.
Check every field, sign where indicated, and store it somewhere safe — digital and printed. One detail that matters: if your school sends the I-20 electronically, print it out and sign the paper copy. A printed, signed I-20 is required at your visa interview and when you enter the United States — a phone screen won't do. Keep it in your carry-on, never in checked luggage.
You'll need your I-20 and SEVIS number to pay the $350 SEVIS fee. Pay it at least three business days before your interview so the payment clears in the system, and bring the printed receipt with you. You'll also need the I-20 details to complete your DS-160 application.
Want us to review your case? Our initial orientation is free and without commitment.
Want us to review your case? Our guidance is free throughout the whole process. You only pay the immigration fees, your personal expenses, and the school you choose. Message us on WhatsApp.
Note: final visa decisions are made exclusively by U.S. consular officers.